Thursday, September 8, 2011

Check out this Plant-Daphne!


Stellar! See, figures like this cannot be messed up with thick glaze, my plan is to underglaze with a wash of brown perhaps with black streaks, paint the birds brightly, and simply clear glaze. She is amazing, she is a true plant-daphne which are part tree, part human, a theme I have used since the beginning of making figures, emanating from the Greek myth of Apollo and Daphne.

The first firing adventure


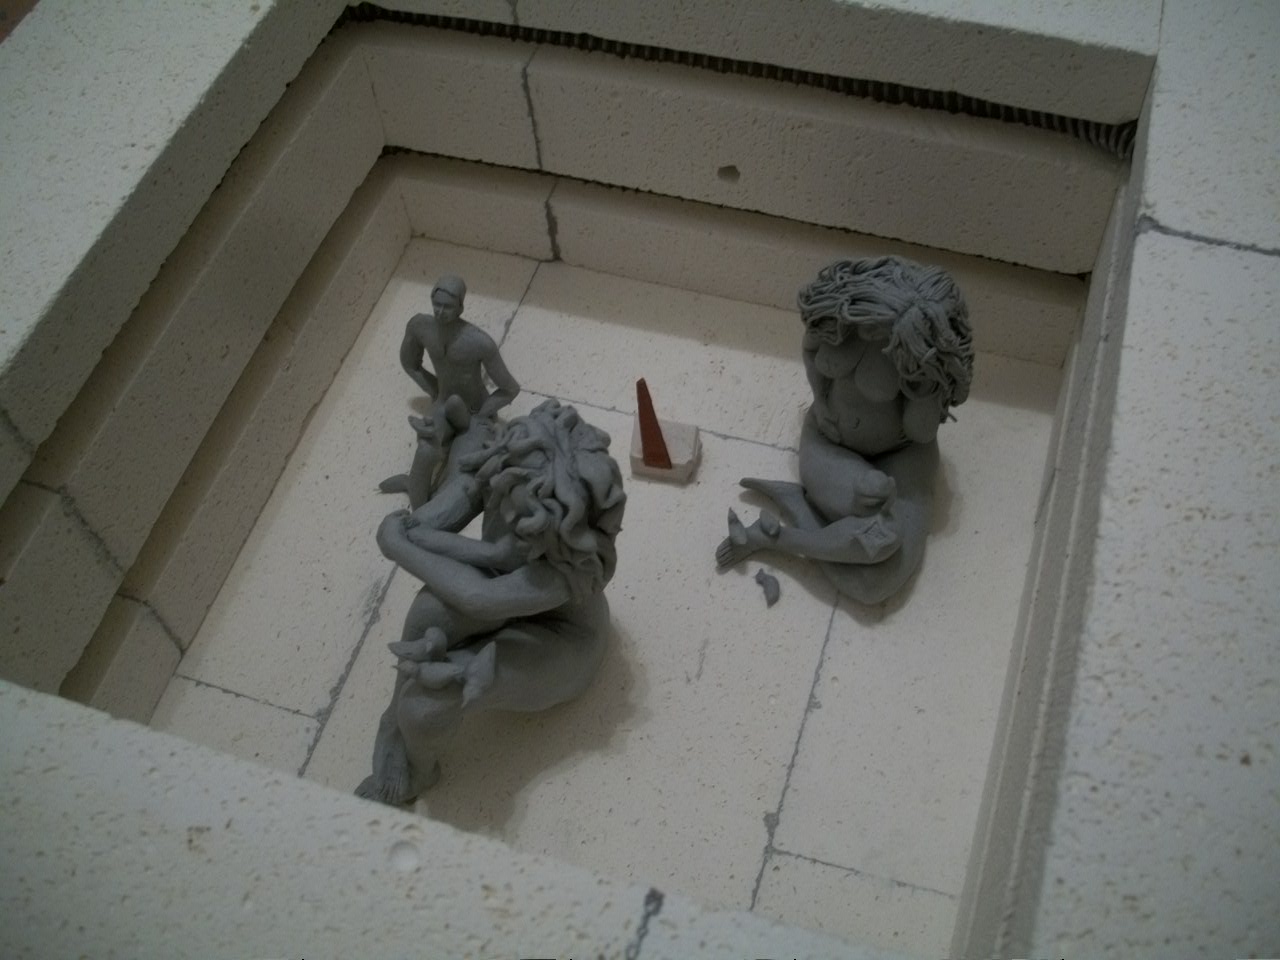
First of all, the kiln with its mere 4.5" in height sure became HUGE for me as I was expecting to only be able to fire maybe three figures at a time, now I see with careful positioning and depending on the size of the figures, I may be able to fire a dozen at a time! I also learned that the witness cone needs to be in the back right so I can see it easily when checking... I also need glasses to filter out that molten light!!!


Above is a photo of the kids all fired up, I am beginning a notebook on all firings to see what works, what doesnt, and to get a better sense of temperature and time with this manual kiln which since its not digital, I have to do all the work and sort of baby sit it, but I like being in control, when I get my next kiln it will be a digital one :)

Just a comparison how the material changes so much when bisque fired.


Okay so now I am ready to glaze.

The photo above shows the figures glazed, I was primarily using them as test tiles to see what colors the glazes did, how they reacted when thick/thin, and if they ran at all when properly fired to their cone. I did learn one thing which I had forgotten since leaving City College. I hate low fire glazes. I used to try and try and try and even formulated my own, only to end up using clear for all my needs, I feel this will happen with this new era of figure making as well.
underglazes work much much better for my purposes and a nice thin clear coat will keep the figures from getting too obscured by the thick glass. While the underglaze will allow me to control the colors and add lots of detailing and painting work... expect lots of underglaze looks for the next firing.


The pic above is the figures fresh out of the oven... I have since added some gold to the far right girl and I took her into work to show people. I must say for the first bisque and glaze, things went really well, totally perfect, but I just dont like the results of low fire glaze so again, I will be using lots of slip work in the next batch which will have more than three figures in it. :)

Wednesday, September 7, 2011

Today is the best day ever!

So the kiln arrived yesterday while I was hanging out so I got home tired and ready for bed, but wait, no! The kiln is here, as well as several glazes and underglaze pencils. I was ecstatic. I had already read the manual in its entirety online so I knew exactly how to run it, I got it fired up and went to bed. WHAT ARE YOU CRAZY??!?!?! Haha, well I got up every two hours to check on the kiln and also to turn it up because I have a manual kiln, not a digital one, which is good for experience. Using my pyrometric cones to let me know where I am temperature wise.
So anyway, after turning off the kiln and going to bed, I woke up this morning to a great surprise, my works of art were perfectly fired and just perfect! They underwent their amazing transformations and were now ceramic works of art, which ping when you pluck them :-p.
wasting no time, I glazed them immediately. I wanted to see what the colors of my glazes actually look like so I used my works sort of as test tiles, to see how much the glazes run if any, and to see what the physical color looks like on glass, not just in a printed photo. They have been glazed fired today, and the kiln is now cooling off. It will be some hours before they are cool enough to handle, but I am excited even though they were not painted "artistically".
I also want to buy MORE glazes but have forced myself to wait at least a week from Thursday because I am getting ahead of myself, besides, I have lots of raw moist clay and really need to turn out some figures so I can do more glaze tests before I actually go getting more glazes. Why not test on a tile? Because Its better to see how they work in the crevices and intricacies of an actual figure, plus tiles are boooooooooooooring!!
I will blog later when they come out so you can see the entire process with photos.

Tuesday, September 6, 2011

My favorite so far

This is my favorite so far of the ceramic figures. Shes awesome! Shes got a bird in flight on her shoulder, what more does she need to be completely amazing? Well, shes got three crested birds which im sure are either blue jays or cardinals (we will see when they are glazed). She also has a natural scene down by where her feet would be, it features a rose, and leaflets and a little plant w/stem, they are all really sort of like allegories to my childhood growing up in Virginia - specifically the time in suffolk with all the woodlands surrounding us, this is why the plants and birds are included (though the number of birds alludes to something else).

If you look closely you will see her legs and arms are not fully formed, or rather differently formed, its funny because I actually am depicting the figure just as I imagine it in this case, with the overall shape of the body, less boxy in general, a nice round belly, breasts not too high up, perfect! The arms and legs are turning into tree limbs, one arm which goes around her back, connects to the other, and the sides have support pieces of clay which resemble roots, its like my plant daphnes are back. I Im very curious to see how all of these gray figures will look when stark white.


Monday, September 5, 2011

fertility guy

I made this fertility guy a couple of days ago, he is small, about half the size of the two other ceramic girls I made. All three figures are bone dry and the kiln comes today!!!
I am going to make a stop by NJ Ceramic supply later today and get some cone 06 and 04 cones as well as some high fire clay and subsequent sitter cones for some of the metallic glazes I have which need to be fired to cone 5 - 6.

Thursday, September 1, 2011

another clay girl is born

Another real clay girl has made her appearance.
I really like her, I am able to translate many things onto ceramic clay that I did in polymer, BUT sometimes working with the material can be frustrating. Even with a spray bottle, my hands, the table, the tools, the air... everything wicks moisture away from the clay as I'm working, requiring very fast shaping time, and less time for perfecting the form. I need to work in a steam room or something, because simply spraying water on, dissolves the actual work and causes the arms to break off and its hard to get them to stay back on... or water pools in places like the toes or in joints, and in time it just melts away... so id rather it dry out. Wetting the hands a little seems to help, but then the piece sticks to it, haha, its a lot of fun all in all. So with this one I was able to extrude hair for her in the machine just like with the polymer clay which was cool.


I have placed six objects on this female figure. Three "objects" and three birds, each symbolizing the holy trinity. The holy spirit is extremely important and thus the holy trinity. The sprouting bud (which remains to be seen whether it will stand up to drying out and firing) is a reference to her belly which she holds, the figure is with child.


the pondering statuesque girl

Howdy folks.
Yesterday I went to NJ Ceramic supply and got some clay and made this girl. She is very statuesque (bulky) as I will have to practice on getting the thinness of the wrists and ankles but I do like her gigantic proportions coupled with a tiny face and really big hair!
In the spirit of keeping my with my style (the whimsical/novelty theme), there will be three birds on her knee (trinity), and a rose on her hip.
I would like to take you through all the processes from this wet stage, to leather hard, bone dry, bisque, and finally glaze. Its very exciting to be making ceramic work again.